
10 Engaging Ways to Introduce Value Scales to Students of Any Age
Understanding value, or the use of light and dark tones in an artwork, is a foundational skill for artists of any age. Learning about value is incredibly exciting as we realize that transitions between lightness and darkness exist all around us, if we train ourselves to notice. An effective introduction to the concept of value provides a solid starting point to learn the basics of Drawing, Painting, Photography, and more. It also gives us better insight into works from Art History and allows us to appreciate the efforts and skills of artists.
Yet in many art classrooms today (and, admittedly, my own until recently), the fascinating and magical translation of visible light into flat tones on paper or canvas becomes quite literally 'flattened out' into a value scale (usually around 9 steps), where students draw equal sized boxes in a row then fill them in with varying levels of darkness, transitioning from black to white.
This is a classic approach and is worth doing. In fact, as an artist who draws and paints, I revisit the value scale often, as a warm-up or for practice. However, this is just one way of understanding value, and our job is to provide multiple entry points in to a concept. Over the past few years working with students of all ages, I have designed the following exercises to help students apply their knowledge about value.

1. Old School / 'Art School': Your traditional 9-step value scale. You can't go wrong with this classic, and it is probably a good idea for all artists to know how to do these. I revisit the 9-step scale from time to time as a way to reconnect with my drawing pencils and remind myself of the subtleties I can achieve with varying levels of pressure on the pencil. I am grateful that my teachers stressed the importance of these. That being said, it is good to be mindful that many of our students will not go on to be people who draw or paint professionally...so for them, I have come up with more engaging, and perhaps less abstract, ways of thinking about value scales.

Here is a traditional 9-step value scale I made on Google Slides for my 2D Design students. I like to do these as warm-ups in my studio before I start drawing or painting, similar to how a musician practices scales before rehearsing.
2. Abstract Value Blocks. Open a photo on your computer, zoom in to an area of solid color, then convert to black and white. Draw an abstraction of what you see. Repeat this 9 times until you have created a new 9-step value scale. This can also be done with print media, if you crop a section of a photo or magazine page.

A 9 step value scale created by cropping segments from a black and white photograph, then determining where each resulting grey belongs in the gradation between black and white.
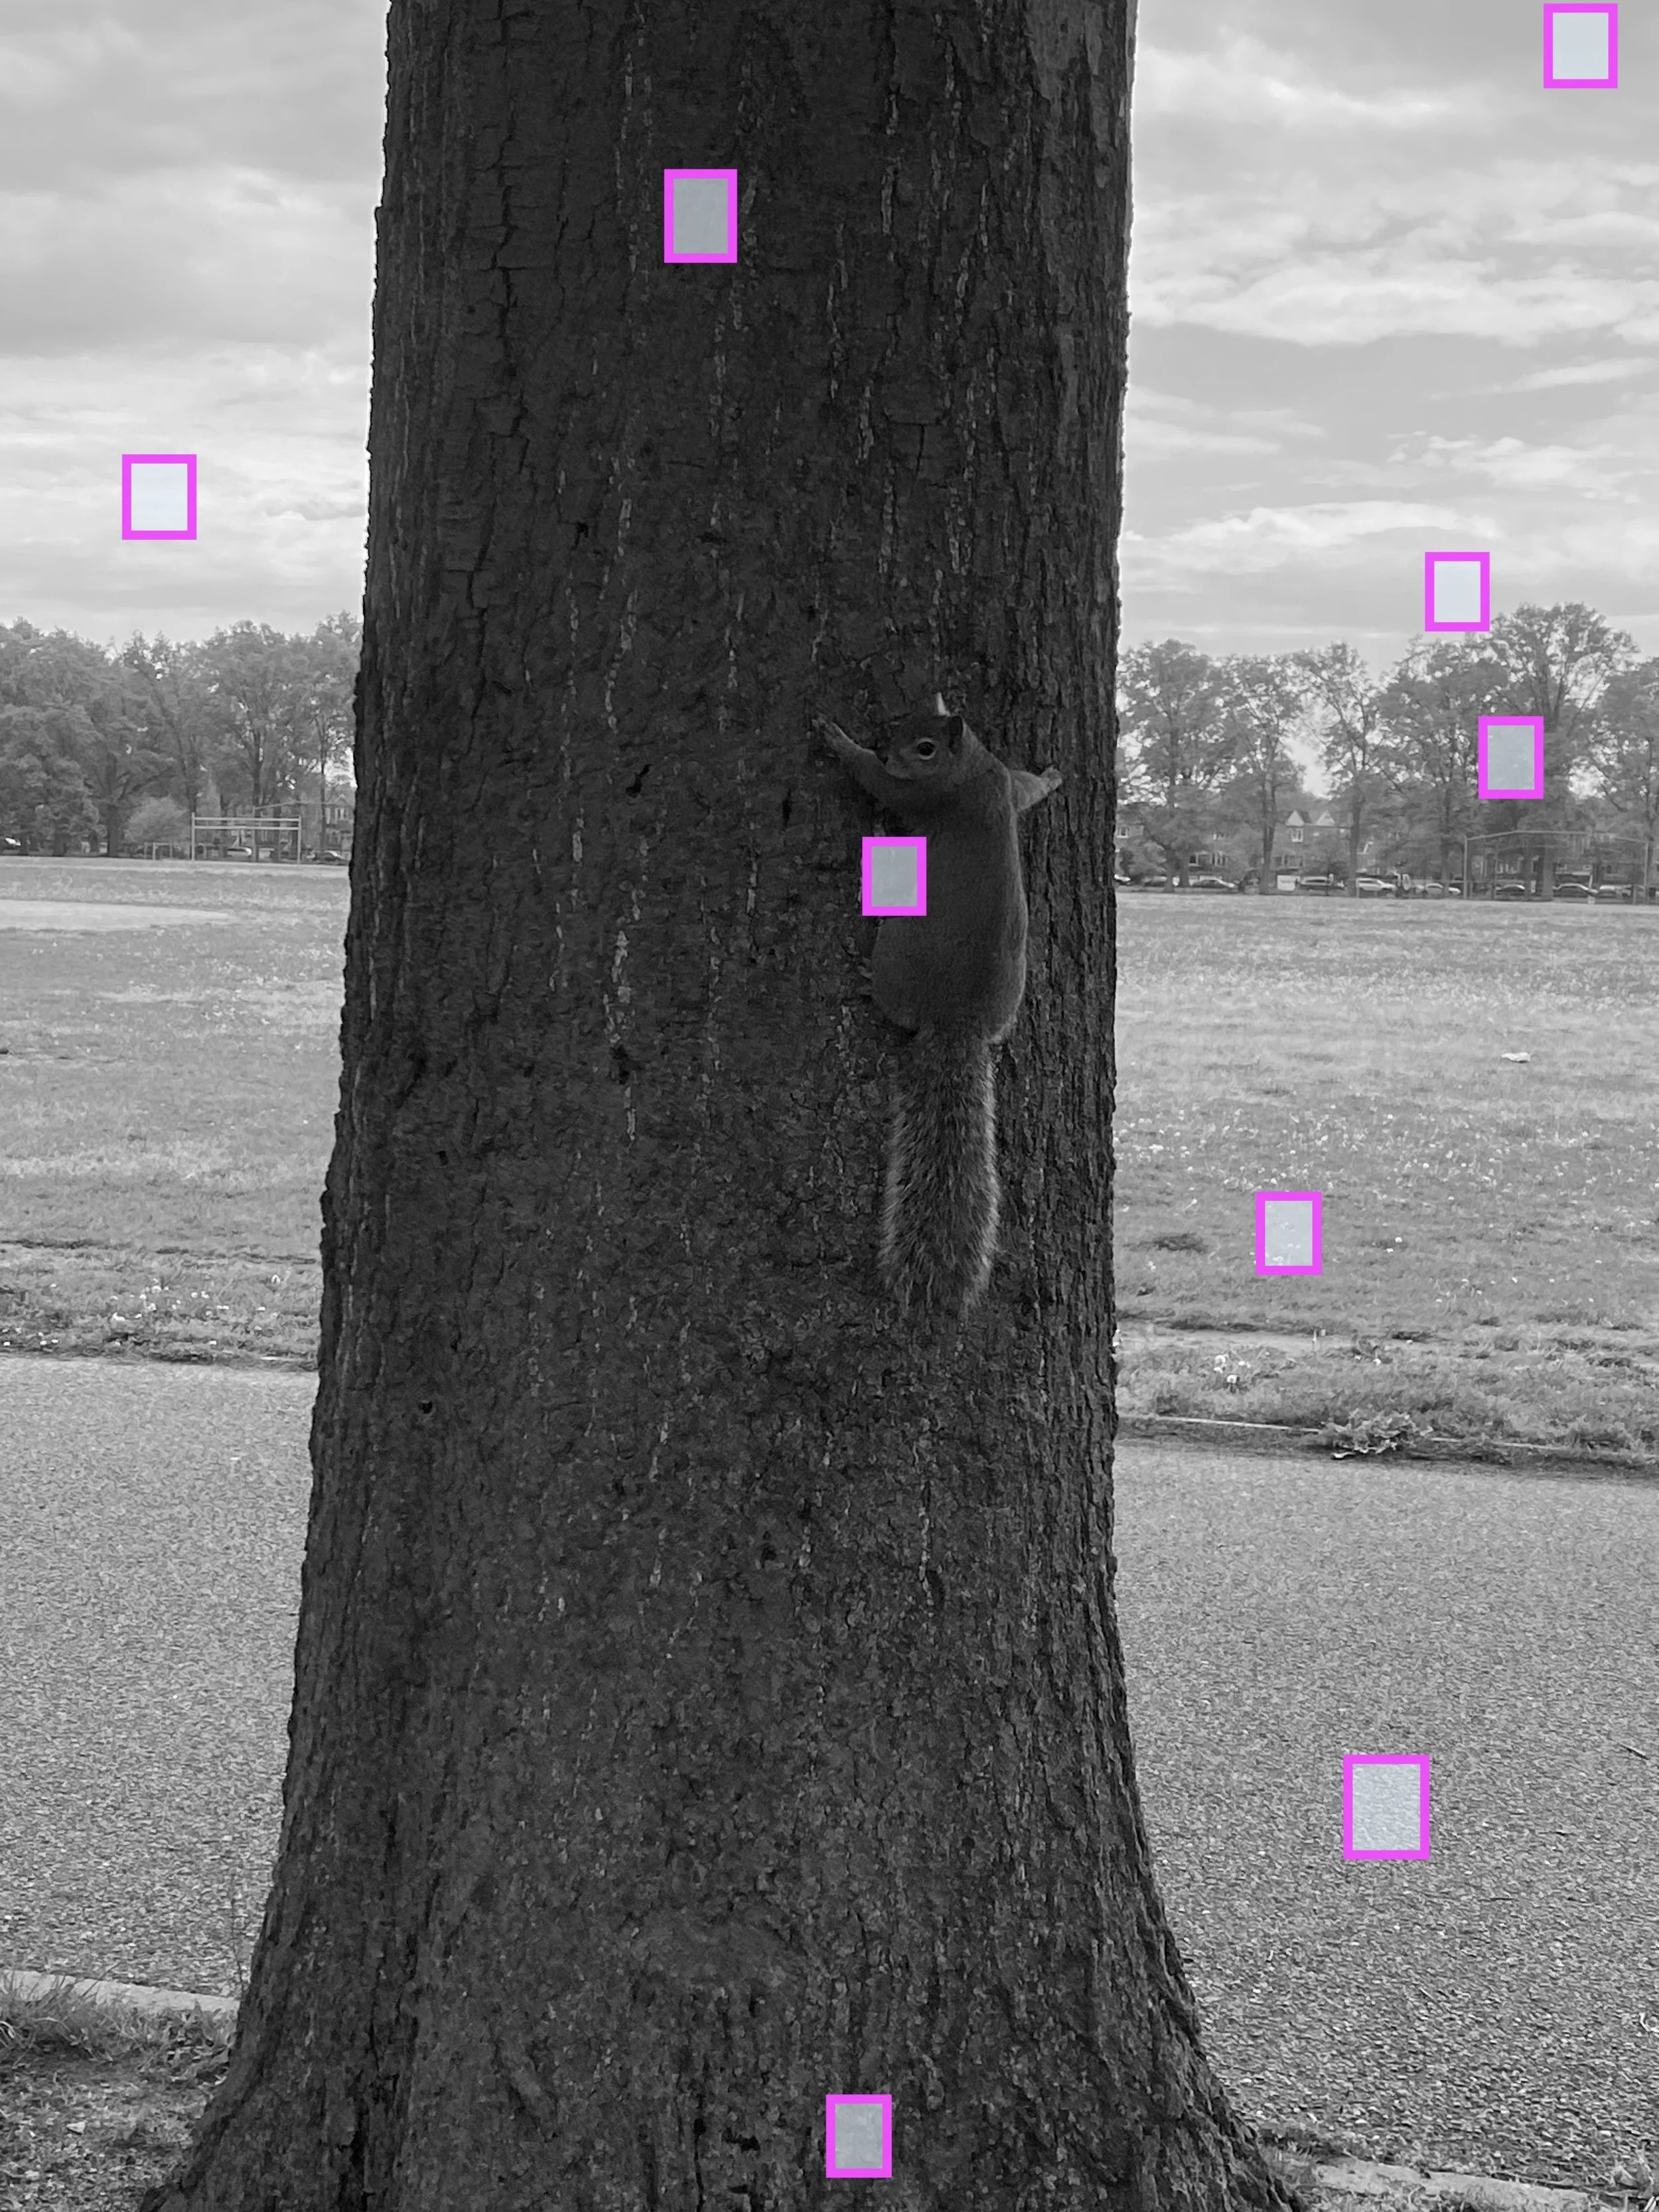
Here, you can see where I found each of the values represented in my value scale.
3. Looking All Around Us. Photograph different ranges of white objects you see around you at different parts of the day and under different lighting conditions. For example, take a white dish and light in a variety of ways. You may even take it into a dark room or cabinet, and photograph what it looks like without light (if you are using your phone camera, you may need to cover the light your phone emits by taping a flap of paper or cloth to the screen temporarily). Upload your photos to a shared slideshow the entire class can edit.
4. Object Gradient Arrangements.
Young Children
Look around your home or classroom and collect objects that are gray, black and white. With younger children, you may wish to do a scavenger hunt with a clipboard and, who knows, maybe even a fun construction hat, magnifying glass, or other props that invite a silly, lighthearted air to the activity. The younger the kids, the fewer 'steps' in the value scale. So Pre-K, K, and Grade 1 might be able to handle a 3 step scale where they negotiate concepts of light, dark, and in the middle. Grades 2-5 will be capable of more subtleties, perhaps stretching to a 5 or 7 step scale as they compare tones against one another as lighter, darker, lightest, darkest.
Teens and Adults
Remember that high schoolers and undergraduates love games and active learning, too! There is space within our rigorous curriculum for fun and interactive activities like this. Teens and adults can benefit from this, especially if you keep the number of 'steps' in the value scale open and flexible. You could have them work together by bringing in, or uploading, objects and doing a collaboration with their team, and have them earn points for their team based on how smoothly their collection transitions from light to dark. You may also have them visit museums (or museum websites) and work together to place a series of artworks in order of overall darkest to overall lightest. In an Art History class, provide laminated print-outs of a series of paintings and have students put them in order of dark to light. This might also involve a study of the color wheel and how colors translate to dark and light tones, or, you could stick with artworks that are monochrome at first.
5. Musical Moves.
Help your students make a connection between the visual and auditory worlds by making an analogy to musical scales. Whether you play an instrument or not, you can easily pick up on some simple scales on the piano or guitar. Practice until you feel comfortable illustrating the concept to your students. You want to glide up and down on the scales, smoothly and with thoughtful transitions. When you hear a musician playing scales, your ear can tell that there is an equal amount of 'space' between the notes. Point out to your students that it does not feel abrupt at all, but instead organic and, to an extent, predictable, similar to the rhythm of climbing stairs.
Greyscale works in the same way---we want to guide our viewer smoothly from one note (light) to another, quite different note (dark), in a way that feels seamless and natural. This works with any age group. Even your youngest kids can grasp the concept of three notes moving up or down in a scale; your high school and college students will appreciate having some music in the classroom, as it is exceedingly rare, beyond the elementary years, to hear music during the school day. Why not bring an instrument in and have them try it out?
6. Greyscale Color Wheel. Find a color wheel and have it handy as you draw a new color wheel lightly in pencil on paper. Then, take your charcoal or pencil and fill in each slot with a corresponding grey tone, until you have completed the wheel. This works best for middle school, high school and undergraduates.
7. Art History Reference. Print a work from art history in black and white, then cut and isolate each tone into a gradation from light to dark, dark to light, or as a wheel. This works very well with abstract paintings or drawings.
8. Continual Value Scale. Have a variety of 'swatches' --- small sheets of paper that are either already within the greyscale, or can be painted or filled in to be different shades of grey. Essentially, you want a different shade of grey on each separate piece of paper. Prep many pieces of paper that are around the same size. Then, slowly over the course of a few weeks or months or even years, add new values to it. Keep them in a stack and fan them out to see which are missing, or have them displayed on the walls or hanging from clothespins in order all around your room. This is best with older kids, grades 6-12. It is also a great activity for students who finish a project early.
9. Backpack Scales. This works best with middle school or high school, because it requires some conceptual thinking about how colors can be converted into grey tones (or maybe you could do this with a handful of monochromatic backpacks and stick within that color). Have students arrange their backpacks in order of darkest to lightest, and chart each backpack on the 9-step value scale.
10. Snack Time. Who doesn’t love a snack? Bring in a variety of snacks, and have students place them in order of darkest to lightest. If you are teaching online, have students upload the photos to a shared folder and then you can insert them into a slideshow and have them collaborate on moving them around, placing them in order.
You could, of course, ask your students to come up with their own way to demonstrate a transition between dark and light. Chances are they will have many, many ideas!
Some ideas for next steps, especially for high schoolers or adults who are working on observational pencil/charcoal drawings—compare your newfound tones to your drawings. Are you favoring some tones over others? Are your drawings in need of some more variety or contrast in value or tone?